

• RMA Dimensional Tolerances For Elastometic Parts (PDF)
| "A2" Precision Drawing Designation Dimensional Tolerance Table for Molded Rubber Products |
|||||
|---|---|---|---|---|---|
| Size (Millimeters) | Size (Inches) | ||||
| Above- Included |
Fixed | Closure | Above- Included |
Fixed | Closure |
| 0-10 | +/-.16 | +/-.20 | 0 - .40 | +/-.006 | +/-.008 |
| 10 - 16 | .20 | .25 | .40 - .63 | .008 | .010 |
| 16 - 25 | .25 | .32 | .63 - 1.00 | .010 | .013 |
| 25 - 40 | .32 | .40 | 1.00 -1 .60 | .013 | .016 |
| 40 - 63 | .40 | .50 | 1.60 - 2.50 | .016 | .020 |
| 63 -100 | .50 | .63 | 2.50 - 4.00 | .020 | .025 |
| 100 - 160 | .63 | .80 | 4.00 - 6.30 | .025 | .032 |
| 160 & over | x .004 | x .005 | 6.30 & over | x .004 | x .005 |
| "A3" Commercial Drawing Designation Dimensional Tolerance Table for Molded Rubber Products |
|||||
|---|---|---|---|---|---|
| Size (Millimeters) | Size (Inches) | ||||
| Above- Included |
Fixed | Closure | Above- Included |
Fixed | Closure |
| 0-10 | +/-.20 | +/-.32 | 0 - .40 | +/-.008 | +/-.013 |
| 10 - 16 | .25 | .40 | .40 - .63 | .010 | .016 |
| 16 - 25 | .32 | .50 | .63 - 1.00 | .013 | .020 |
| 25 - 40 | .40 | .63 | 1.00 -1 .60 | .016 | .025 |
| 40 - 63 | .50 | .80 | 1.60 - 2.50 | .020 | .032 |
| 63 -100 | .63 | 1.00 | 2.50 - 4.00 | .025 | .040 |
| 100 - 160 | .80 | 1.25 | 4.00 - 6.30 | .032 | .050 |
| 160 & over | x .005 | x .008 | 6.30 & over | x .005 | x .008 |
When applying tolerances, keep the following rules in mind:
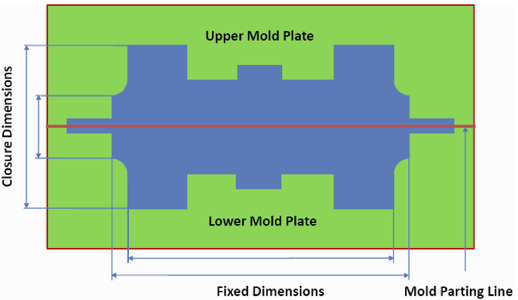
Cross-Sectional View of Rubber Mold

- Consider using the maximum possible tolerance on your product.
- Regarding "A2" tolerances and t ighter, it is highly advisable to predetermine and agree upon a common method of measurement to reduce repeatability errors and rejected shipments.
- It is often practical and wise to have a prototype cavity machined to evaluate the dimensional accuracy of the part you wish to manufacture. A much superior job of "dialing in" the desired final result can be accomplished using this method.
Cross-Sectional View of Rubber Mold


